Use Machine Learning and Python for Easy Text Classification
The topic of machine learning has never been so hot and for good reason. With machine learning (ML), you’re able to take SEO automation, forecasting, classification, etc to the next level. The problem previously was that machine learning was reserved for only the most advanced data scientists and engineers due to its inherent sophistication.
Not any more! Due to the heroic efforts by data scientists at Hugging Face (a popular machine learning organization), modules, datasets, and algorithms are now accessible for those even with basic Python skills.
In this tutorial, I’m going to show you how easy it is to use Hugging Face’s ML packages to classify your website pages using a given list of categories in under 30 lines! Once you classify your content, you can find interesting insights across content categories.
Quick app teaser! Charly Wargnier is currently working hard on a SEO Streamlit app that extends a similar script in so many ways. I can’t wait for it to be released, maybe in November, it will be a game-changer! Stay tuned on Charly’s Twitter feed.
Table of Contents
Requirements and Assumptions
- Python 3 is installed and basic Python syntax understood
- Access to a Linux installation (I recommend Ubuntu) or Google Colab.
- Set of labels to be used for categorization
- ScreamingFrog crawl HTML CSV
Install Python Modules
We will use the HuggingFace transformer module do to all the heavy ML lifting. It’s quite simple in usage. Remember if you are running in Google Colab to add an exclamation mark at the beginning
!pip3 install transformers
Now let’s import the two modules we need:
- transformers: transformers module provides general-purpose architectures (BERT, GPT-2, RoBERTa, XLM, DistilBert, XLNet…) for Natural Language Understanding (NLU)
- pandas: for storing the results into a dataframe
- collections: for counting the number of each label tagged
### import modules
from transformers import pipeline
import pandas as pd
from collections import Counter
Import Crawl Data and Create Label List
Next, we’ll import our page titles and meta descriptions for each page from our CSV ScreamingFrog file. The second line is an optional filter if you only want to label a certain path structure. The third line is if you want to strip out any boilerplate branding that could influence the evaluation. Uncommented them if desired. Furthermore, processing can be slow and thus making testing tedious if you have a long URL list. I have added a snippet that only grabs the first 50 rows of the dataframe. Uncomment #[:50] if you want to take advantage of that for debugging.
df = pd.read_csv('internal_html.csv')[['Address','Title 1','Meta Description 1']]#[:50]
#df = df[df['Address'].str.contains("/blog/")]
#df['Title 1']= df['Title 1'].str.replace('importSEM','',regex=True)
Now we create our label or label list (below is my test list, be sure to create your own). The Transformer will intake this list, score each against the title and meta description and we’ll grab the highest score. This is how we categorize each page. Note, the longer the list, the longer the processing. There is a direct relationship between processing time and the length of the label list and your titles/meta. It also helps accuracy if you have a highly distinct label list. The most similar they are, the most often you get split results.
labels = ['Google','Images','Keyword','API','Automation','Text Analysis','Scraping','Audit','NLP','Regex','Twitter','GSC']
Configure Machine Learning Transformer
This is the muscle behind it all. This simple piece of code loads the Hugging Face transformer pipeline. “zero-shot-classification” is the machine learning method in which “the already trained model can classify any text information given without having any specific information about data.” This has the amazing advantage of being able to be deployed easily and quickly on any text and label list. The downside is depending on your lists and text, it may not be as accurate as if you used a model trained on a more relevant dataset.
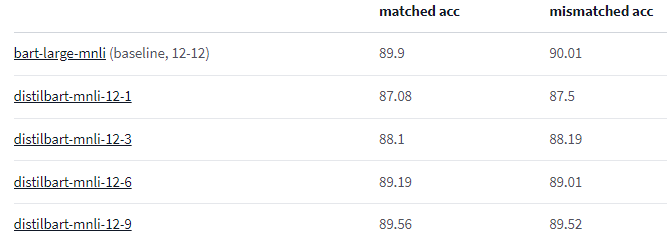
Speaking of datasets, the model attribute loads, you guessed it, the model. Here we have chosen valhalla/distilbart-mnli-12-3. This is a distilled version of BART trained on the MNLI dataset. 12-3 (~1GB) is the measure of distillation. In fact, you can choose the non-distilled version here: facebook/bart-large-mnli (~1.7GB). The upside to the distilled version is that it’s much smaller and faster with only about a percent loss of accuracy. There are other distilled versions like 12-1, 12-6, and 12-9 you can try out that are different sizes. The size of the model matters when you are processing hundreds or thousands of pages. If any version of BART is too slow, you can try this uncased BERT model, which is super fast, light, but has an accuracy rating of 80% compared to 88+ with BART.
classifier = pipeline("zero-shot-classification",
                      model="valhalla/distilbart-mnli-12-3")
Next, we simply create a couple of empty lists that will store all the label results.
label_list = []
label_list_score = []
Process Crawl Data
Now it’s time to iterate through the titles in our dataframe from earlier. At this point, you can decide to classify solely on the title or if you feel you need more context, you can append the meta description which I’m doing below. If you want to use only the title, simply remove the code: + ". " + row[2] from below. At this stage, you may also choose to clean the data a bit. In some cases, you may want to lowercase everything or make some replacements. Furthermore, sometimes, the meta can inject too much context and it changes the labeling if not laser-focused. If you find that is the case, uncomment #[:50] and the number inside is how many characters of the meta you want to include.
for index, row in df.iterrows():

  string_to_classify = row[1] + ". " + row[2]#[:50]
  result = classifier(string_to_classify, labels)
The processing time is determined by the weight of the model you are using, the number of labels in your list, and the length of the string (title + meta) you are classifying. In some cases, this can be as high as 30 seconds per evaluation. You can reduce this time by adjusting the factors listed above.
Once the result is returned it will be in JSON format for us to parse easily. We’ll grab the highest-scoring label and the corresponding score (1 is a perfect match). Note that all labels will be evaluated and given a score. This is why processing can take a long time.
label = result["labels"][0]
label_score = str(round(result["scores"][0],3))
Next, we simply append the chosen label and the score to each corresponding list.
label_list.append(label)
label_list_score.append(label_score)
All that is left is to add the lists to our initial dataframe and export the CSV.
df['Label'] = label_list
df['Label Score'] = label_list_score
df.to_csv("title-with-meta3.csv")
Optional: Get Label Counts
If you’re interested to know right away how many times each label was used you can add this code below. Depending on your results, you may want to tweak your labels if what is returned is not what you expect. Otherwise, you can import the CSV into Google Sheets and use the Query formula with Count() to get the same output.
counts = Counter(output).most_common(len(output))

for key, value in counts:
  print(key + ": " + value)
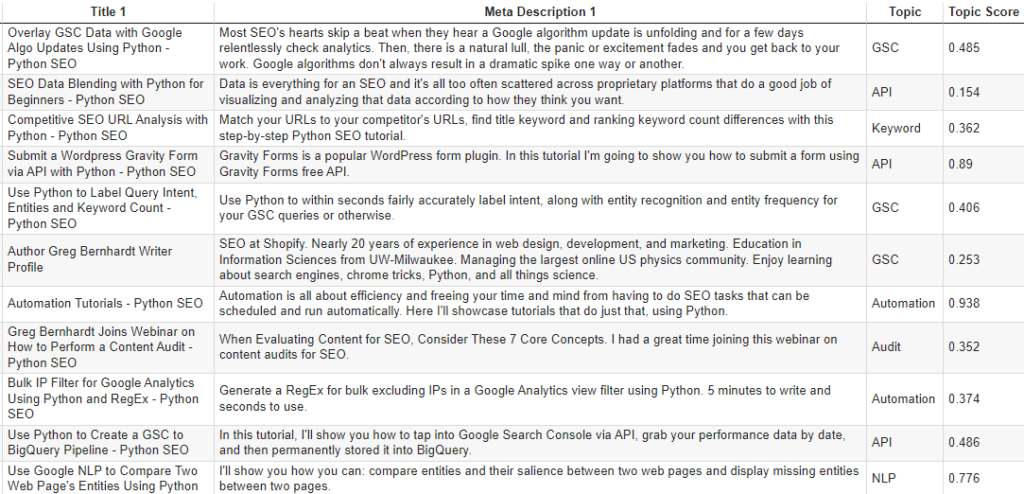
Example Output
Conclusion
The ability to access complex machine learning tools for SEO has never been easier. You now have the ability to categorize content to your heart’s content. Keep in mind, you’ll still want to manually do some quality assurance on the results. The models at best are 83-90% accurate and still depend heavily on the text you are labeling and the label list you provide. With that said, it’s not magic and not always perfect. Many adjustments are often needed and in some cases, this method just doesn’t work and you still need to label by hand.
Thanks for ML guidance over the past few weeks by Charly Wargnier, Andrea Volpini, Kane Jameson, Elias Dabbas, and JC Chouinard
Quick app teaser! Charly Wargnier is currently working hard on an app that extends a similar script in many ways. I can’t wait for it to be released, it will be a game-changer! Stay tuned on his Twitter feed.
Now get out there and try it out! Follow me on Twitter and let me know your applications and ideas!
Python Text Classification FAQ

- Evaluate Subreddit Posts in Bulk Using GPT4 Prompting - December 12, 2024
- Calculate Similarity Between Article Elements Using spaCy - November 13, 2024
- Audit URLs for SEO Using ahrefs Backlink API Data - November 11, 2024