Use Google NLP to Compare Two Web Page’s Entities Using Python
This is part 2 of a 2 part series. Please see Getting Started with Google NLP API Using Python first.
For Search Engines and SEO, Natural Language Processing (NLP) has been a revolution. NLP is simply the process and methodology for machines to understand human language. This is important for us to understand because machines are doing the bulk of page evaluation, not humans. While knowing at least some of the science behind NLP is interesting and beneficial, we now have the tools available to us to use NLP without needing a data science degree. By understanding how machines might understand our content, we can adjust for any misalignment or ambiguity. Let’s go!
In this intermediate tutorial part 2, using two web pages, I’ll show you how you can:
- Compare entities and their salience between two web pages
- Display missing entities between two pages
I highly recommend reading through the full Google NLP documentation for setting up the Google Cloud Platform, enabling the NLP API, and setting up authentication.
Table of Contents
Requirements and Assumptions
- Python 3 is installed and basic Python syntax understood
- Access to a Linux installation (I recommend Ubuntu) or Google Colab
- Google Cloud Platform account
- NLP API Enabled
- Credentials created (service account) and JSON file downloaded
Import Modules and Set Authentication
There are a number of modules we’ll need to install and import. If you are using Google Colab, these modules are preinstalled. If you are not, you will need to install the Google NLP module.
- os – setting the environment variable for credentials
- google.cloud – Google’s NLP modules
- pandas – for organizing data into a dataframes
- fake_useragent – for generating a user agent when making a request
- matplotlib – for the scatter plots
Out of those these 2 need to be installed. Google Colab has pandas installed but is outdated and we need the newest versions (as of this publish date)
!pip3 install fake_useragent
!pip3 install pandas==1.1.2
import os
from google.cloud import language_v1
from google.cloud.language_v1 import enums

from google.cloud import language
from google.cloud.language import types

import matplotlib.pyplot as plt
from matplotlib.pyplot import figure

from fake_useragent import UserAgent
import requests
import pandas as pd
import numpy as np
Next, we set our environment variable, which is a kind of system-wide variable that can be used across applications. It will contain the credentials JSON file for the API from Google Developer. Google requires it be in an environment variable. I am writing as if you are using Google Colab, which is the code block below (don’t forget to upload the file). To set the environment variable in Linux (I use Ubuntu) you can open ~/.profile and ~/.bashrc and add this line export GOOGLE_APPLICATION_CREDENTIALS="path_to_json_credentials_file". Change “path_to_json_credentials_file” as necessary. Keep this JSON file very safe.
os.environ['GOOGLE_APPLICATION_CREDENTIALS'] = "path_to_json_credentials_file"
Build NLP Function
Since we are using the same process to evaluate both pages we can create a function. This helps reduce redundant code. This function named processhtml() shown in the code below will:
- Create a new user agent for the request header
- Make the request to the web page and store the HTML content
- Initialize the Google NLP
- Communicate to Google that you are sending them HTML, rather than plain text
- Send the request to Google NLP
- Store the JSON response
- Convert the JSON into a python dictionary with the entities and salience scores (adjust rounding as needed)
- Convert the keys to lower case (for comparing)
- Return the new dictionary to the main script
def processhtml(url):

    ua = UserAgent()
    headers = { 'User-Agent': ua.chrome }
    res = requests.get(url,headers=headers)
    html_page = res.text

    url_dict = {}

    client = language_v1.LanguageServiceClient()

    type_ = enums.Document.Type.HTML

    language = "en"
    document = {"content": html_page, "type": type_, "language": language}

    encoding_type = enums.EncodingType.UTF8

    response = client.analyze_entities(document, encoding_type=encoding_type)

    for entity in response.entities:
        url_dict[entity.name] = round(entity.salience,4)

    url_dict = {k.lower(): v for k, v in url_dict.items()}

    return url_dict
Process NLP Data and Calculate Salience Difference
Now that we have our function we can set the variables storing the web page URLs we want to compare and then send them to the function we just made.
url1 = "https://www.rocketclicks.com/seo/"
url2 = "http://www.jenkeller.com/websitesearchengineoptimization.html"

url1_dict = processhtml(url1)
url2_dict = processhtml(url2)
We now have our NLP data for each URL. It’s time to compare the two entity lists and if there are matches, calculate the difference in salience if your competitor’s is higher. This code snippet:
- Create an empty datafame with 4 columns (Entity, URL1, URL2, Difference). URL1 and URL2 will contain the salience scores for each entity for that URL.
- Compare each entity between each list and if there is a match add the salience score for each in a variable
- If your competitor salience score for a keyword is greater than yours, record the difference (adjust the rounding as needed)
- Add the new comparison data for the entity to the dataframe
- Print out the dataframe after all entities are done being matched
df = pd.DataFrame([], columns=['Entity','URL1','URL2','Difference'])

for key in set(url1_dict) & set(url2_dict):
    url1_keywordnum = str(url1_dict.get(key,"n/a"))
    url2_keywordnum = str(url2_dict.get(key,"n/a"))

    if url2_keywordnum > url1_keywordnum:
        diff = str(round(float(url2_keywordnum) - float(url1_keywordnum),3))
    else:
        diff = "0"

    new_row = {'Keyword':key,'URL1':url1_keywordnum,'URL2':url2_keywordnum,'Difference':diff}

    df = df.append(new_row, ignore_index=True)

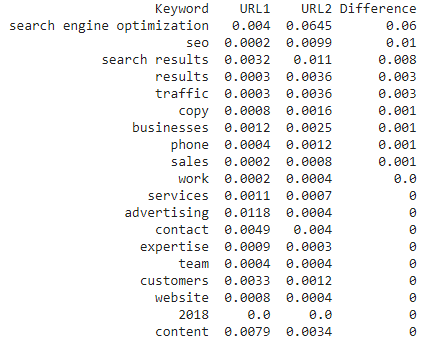
print(df.sort_values(by='Difference', ascending=False))
Example Output
This result tells us there are at least 9 entities found on both pages that are deemed by Google NLP more important (relative to the whole text) on the competitor page. These are keywords you may want to investigate and consider ways to communicate better on your page. I have rounded the salience scores to 3 decimal places, feel free to adjust to uncover finer differences.

Find Difference in Named Entities
Next, it can be useful, especially for a competitor page that is outranking our page, to find the entities that exist on their page that is missing from your page. This snippet below:
- Use set() to compare entities between the two dictionaries. The entities found in the competitor list but not in your list, are left and stored in diff_lists.
- set() strips values from the dictionary, which is our salience score, so we need to add them back in
- Add the final_diff dictionary list we created to the dataframe
- Print the dataframe and sort by score descending
diff_lists = set(url2_dict) - set(url1_dict)

final_diff = {}

for k in diff_lists:
  for key,value in url2_dict.items():
    if k == key:
      final_diff.update({key:value})

df = pd.DataFrame(final_diff.items(), columns=['Keyword','Score'])

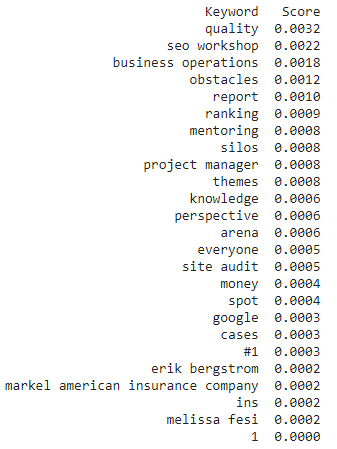
print(df.head(25).sort_values(by='Score', ascending=False))
Example Output
This list shows the top 25 (adjust head() for more) entities by salience that appears on the competitor page that doesn’t appear on your page. This is useful to find entity opportunities where pages that outrank you are using but you are not.

Conclusion
I hope you enjoyed this two-part series on getting started with NLP and how to compare entities between web pages. These scripts are foundations and can be extended to the limit of your imagination. Explore data blending with other sources and mine for further insights. Enjoy and as always, follow me on twitter and let me know what you think and how we’re using Google NLP!
Google NLP and Entities FAQ
- Evaluate Subreddit Posts in Bulk Using GPT4 Prompting - December 12, 2024
- Calculate Similarity Between Article Elements Using spaCy - November 13, 2024
- Audit URLs for SEO Using ahrefs Backlink API Data - November 11, 2024


