Getting Started with Google NLP API Using Python
For Search Engines and SEO, Natural Language Processing (NLP) has been a revolution. NLP is simply the process and methodology for machines to understand human language. This is important for us to understand because machines are doing the bulk of page evaluation, not humans. While knowing at least some of the science behind NLP is interesting and beneficial, we now have the tools available to us to use NLP without needing a data science degree. By understanding how machines might understand our content, we can adjust for any misalignment or ambiguity.
This will be a 2 part series:
- Process using user-entered text
- Process a comparison between two different web pages
In this intermediate tutorial, I’ll take you through basic implementations for 4/5 of Google’s NLP API offering (no Syntax). With a given text we will:
- Identify Entities and Generate Salience Scores
- Calculate Sentiment Scores
- Calculate Sentiment Magnitude
- Categorize
I highly recommend reading through the full Google NLP documentation for setting up the Google Cloud Platform, enabling the NLP API, and setting up authentication.
Note that these scripts contain some modified portions from Google’s own samples. No need to reinvent the wheel!
Table of Contents
Requirements and Assumptions
- Python 3 is installed and basic Python syntax understood
- Access to a Linux installation (I recommend Ubuntu) or Google Colab
- Google Cloud Platform account
- NLP API Enabled
- Credentials were created (service account) and a JSON file downloaded
Import Modules and Set Authentication
There are several modules we’ll need to import. If you are using Google Colab, these modules are preinstalled. If you are not, you will need to install the Google NLP module.
- os – setting the environment variable for credentials
- google.cloud – Google’s NLP modules
- numpy – for a specific dictionary comparison function
- matplotlib – for the scatter plots
import os
from google.cloud import language_v1
from google.cloud.language_v1 import enums

from google.cloud import language
from google.cloud.language import types

import numpy as np
import matplotlib.pyplot as plt
from matplotlib.pyplot import figure
Next, we set our environment variable, which is a kind of system-wide variable that can be used across applications. It will contain the credentials JSON file for the API from Google Developer. Google requires it be in an environment variable. I am writing as if you are using Google Colab, which is the code block below (don’t forget to upload the file). To set the environment variable in Linux (I use Ubuntu) you can open ~/.profile and ~/.bashrc and add this line export GOOGLE_APPLICATION_CREDENTIALS="path_to_json_credentials_file". Change “path_to_json_credentials_file” as necessary. Keep this JSON file very safe.
os.environ['GOOGLE_APPLICATION_CREDENTIALS'] = "path_to_json_credentials_file"
It’s time to start using the API! The code below is a rather large chunk, but I want you to see it whole, rather than chopped up. text_content variable contains the text we will be analyzing. I limit it to 1000 characters because that is equal to 1 unit. Google NLP API is priced in units. We don’t want you to accidentally copy and paste a dictionary in there and then get charged! Next, we initialize the Google NLP module, select a type (we are analyzing plain text), and select a language (optional, it can auto-detect).
After packaging up the requested data, it’s sent to Google’s NLP. We then loop over the entity list that is returned to print out the name, type, salience score, and metadata. I round the salience score to 3 decimal points. Adjust as wanted.
Identify Entities
text_content = "The key to successful internet marketing is to make decisions that make sense for your business, your company and your customers. We work with you to build a custom strategy that drives both visits and conversions."

text_content = text_content[0:1000]

client = language_v1.LanguageServiceClient()

type_ = enums.Document.Type.PLAIN_TEXT

language = "en"
document = {"content": text_content, "type": type_, "language": language}

encoding_type = enums.EncodingType.UTF8

response = client.analyze_entities(document, encoding_type=encoding_type)

for entity in response.entities:
    print(u"Entity Name: {}".format(entity.name))

    print(u"Entity type: {}".format(enums.Entity.Type(entity.type).name))

    print(u"Salience score: {}".format(round(entity.salience,3)))

    for metadata_name, metadata_value in entity.metadata.items():
        print(u"{}: {}".format(metadata_name, metadata_value))

    print('\n')
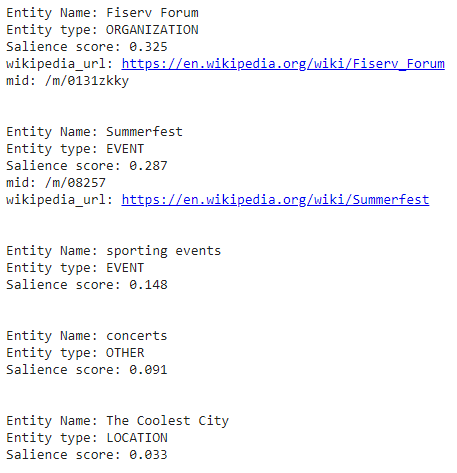
Below is the example entity output for the text (from Wikipedia): “Summerfest, the largest music festival in the world, is also a large economic engine and cultural attraction for the city. In 2018, Milwaukee was named “The Coolest City in the Midwest” by Vogue magazine.”
The salience score is a metric of calculated importance about the rest of the text. It is important and should be one of the main takeaways. If your salience scores don’t line up with your intent/purpose goals for the text then adjustments should be made. MID is “Machine ID” and is the identification label for the entity. Entities with mids indicate Google has strong confidence of understanding and it likely has a comprehensive spot in the Google Knowledge Graph.

Calculate Sentiment Score
We’ll inherit a lot of data from earlier and pass it through client.analyze_sentiment(). In return, we get a sentiment score and magnitude. We will be processing the score for now and magnitude in the next bit. I round to 4 decimal spots. Sentiment score works within a range of -1 to 1. -1 being the most negative, and 1 being the most positive. Next, I set up some conditionals for a little score labeling and then print it out. After that, I thought it would be fun to display a visual and I ended up on a modified scatter plot as a kind of number line. Setting anything below 1 to a red dot and above 0 to a green dot. Modify as needed.
document = types.Document(
    content=text_content,
    type=enums.Document.Type.PLAIN_TEXT)

sentiment = client.analyze_sentiment(document=document).document_sentiment
sscore = round(sentiment.score,4)
smag = round(sentiment.magnitude,4)

if sscore < 1 and sscore < -0.5:
  sent_label = "Very Negative"
elif sscore < 0 and sscore > -0.5:
  sent_label = "Negative"
elif sscore == 0:
  sent_label = "Neutral"
elif sscore > 0.5:
  sent_label = "Very Positive"
elif sscore > 0 and sscore < 0.5:
  sent_label = "Positive"

print('Sentiment Score: {} is {}'.format(sscore,sent_label))

predictedY =[sscore]
UnlabelledY=[0,1,0]

if sscore < 0:
    plotcolor = 'red'
else:
    plotcolor = 'green'

plt.scatter(predictedY, np.zeros_like(predictedY),color=plotcolor,s=100)

plt.yticks([])
plt.subplots_adjust(top=0.9,bottom=0.8)
plt.xlim(-1,1)
plt.xlabel('Negative                                                            Positive')
plt.title("Sentiment Attitude Analysis")
plt.show()
Below is the sentiment output for the text we used for the entity analysis above. As you can see it registers as slightly positive.

Calculate Sentiment Magnitude
Next up we process and visualize the Sentiment magnitude we got earlier. Sentiment magnitude expresses the perceived amount of emotion in a text. First a bit more conditional labeling. Anything between 0-1 is no/little emotion, between 1-2 is low emotion and 2+ is high emotion. It is noted that often the larger the content set, the larger the magnitude. One should feel free to adjust these conditionals as needed. The rest is pretty much the same as we did for the Sentiment score.
if smag > 0 and smag < 1:
  sent_m_label = "No Emotion"
elif smag > 2:
  sent_m_label = "High Emotion"
elif smag > 1 and smag < 2:
  sent_m_label = "Low Emotion"

print('Sentiment Magnitude: {} is {}'.format(smag,sent_m_label))

predictedY =[smag]
UnlabelledY=[0,1,0]

if smag > 0 and smag < 2:
    plotcolor = 'red'
else:
    plotcolor = 'green'

plt.scatter(predictedY, np.zeros_like(predictedY),color=plotcolor,s=100)

plt.yticks([])
plt.subplots_adjust(top=0.9,bottom=0.8)
plt.xlim(0,5)
plt.xlabel('Low Emotion                                                          High Emotion')
plt.title("Sentiment Magnitiude Analysis")
plt.show()
Below is the sentiment magnitude for the text. Close to zero indicates little/neutral emotion.

Calculate Categorization
Category analysis is very straightforward. The NLP will process the text it’s given and try to place it into any number of preset categories where there is a high enough confidence.
response = client.classify_text(document)

for category in response.categories:
    print(u"Category name: {}".format(category.name))
    print(u"Confidence: {}%".format(int(round(category.confidence,3)*100)))
Finally here is the calculated categorization. Again, if this doesn’t line up with your goal, it’s time to adjust.

Here is the Google colab notebook
Now you have tools to easily identify entities, and categorize and calculate sentiment and magnitude (emotion). Part two will go over how to use these NLP tools but with web page content instead of copying and pasting text and in the third part, we will explore how to compare two web pages. Stay tuned!
Google NLP and Python FAQ
- Evaluate Subreddit Posts in Bulk Using GPT4 Prompting - December 12, 2024
- Calculate Similarity Between Article Elements Using spaCy - November 13, 2024
- Audit URLs for SEO Using ahrefs Backlink API Data - November 11, 2024


