
Getting Started with Google Cloud Functions and Google Scheduler
If you’re tired of running and scheduling all your scripts locally or in Google Colab and are interested in what the Cloud can offer, then this tutorial is for you! I’m going to show you step-by-step how to migrate and automate your Python script using Google Cloud Platform (GCP). GCP offers two services called Google Cloud Functions and Google Scheduler. Both these services offer a free tier that is pretty easy to stay at. Before we dive into setting up Google Cloud Functions and Google Scheduler I want to quickly address a couple of other options for managing and running your Python scripts. The three most common methods are them locally, with Google Colab or Cloud Functions with Scheduler.
Table of Contents
Local Machine
Pros
- Convenient Setup
Simply run your scripts from your local development machine (personal or business PC) - Full Environment Flexibility
It’s your machine, so install and configure as you see fit
Cons
- PC Up-Time
You either have to manually run the scripts or schedule them via cron but then your machine must be kept on depending on your schedule - You must handle backups, security, and maintenance of your machine
Google Colab
Pros
- Shared Control
With Google Colab being in the cloud and a standard Google product, you can share your notebooks with anyone and they can run the scripts with ease. - No Setup
The environment is ready for you upon loading
Cons
- No Official Scheduling Options
There are some clever ways people have managed to schedule Colab notebooks, but none are straightforward or future-proof. - Uploaded files are removed after instance expiration
You’ll need to keep reuploading needed support files
Google Cloud Functions with Google Scheduler
Pros
- Shared Control
Like Colab you can share access to your scripts and scheduler with colleagues with ease. - Outsource Your Security, CPU and Backups
Your script will be stored and run in Google’s secure cloud servers.
Cons
- Moderate Setup Time
Although the actual setup process is quite straightforward, if your scripts are long and complex it can take time massaging your code to fit Cloud Functions environment. It’s rarely as simple as copy and paste. - 9min Execution Limit
The free tier has a max execution limit of 9 minutes. This is suitable for many many scripts, but I can think of some crawling scripts where that won’t be enough time.
Setup Google Cloud Functions
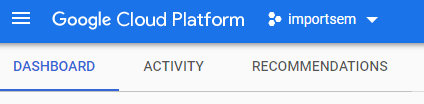
First login to Google Cloud Platform (GCP). If you have another Google product like Gmail it should auto-login to your account. GCP is the environment where all Google Cloud services are managed. Next, you’ll want to set up a project You can select an existing project to use or create a new project by clicking the drop-down in the upper left corner next to the GCP logo as seen below where I have importsem already created.
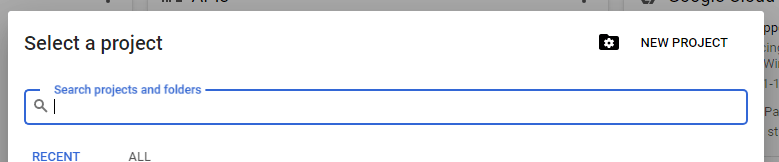
If you already have a project you want to use you can select that here or click “New Project” in the top right corner.
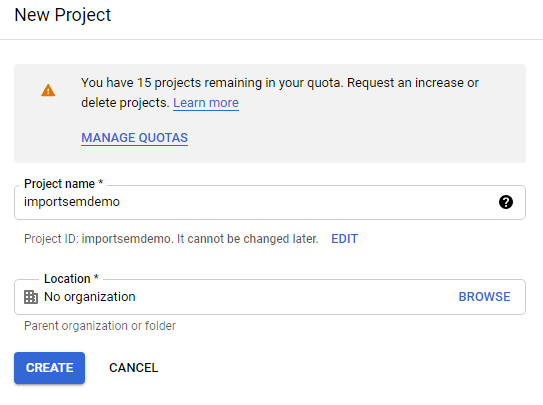
Simply enter a project name and an organization if you have that set up already, it is optional. It’s essential to organize projects into folders. FYI, my example below is now removed.
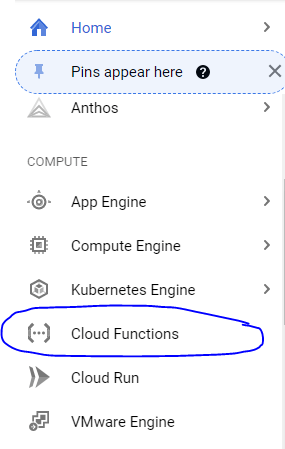
Now that you’ve created your project, it’s time to enter Google Cloud Functions (GCF). It can be found in the left sidebar, in the Compute category, among a list of many other GCP products.
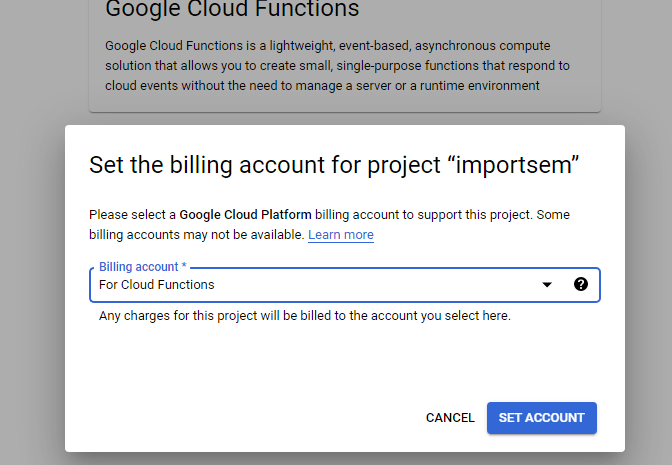
At this point, Google will detect if you have a billing account already created. GCF has a free tier that is very easy to stay within for smallish to medium projects, but if you go over, you’ll need to pay. The most I ever paid was 2 cents overage. If you have already created a billing account you can attach it to this project like below. Otherwise, it will guide you to creating one. It’s quick and easy and not worth showing here. You just enter your payment details.
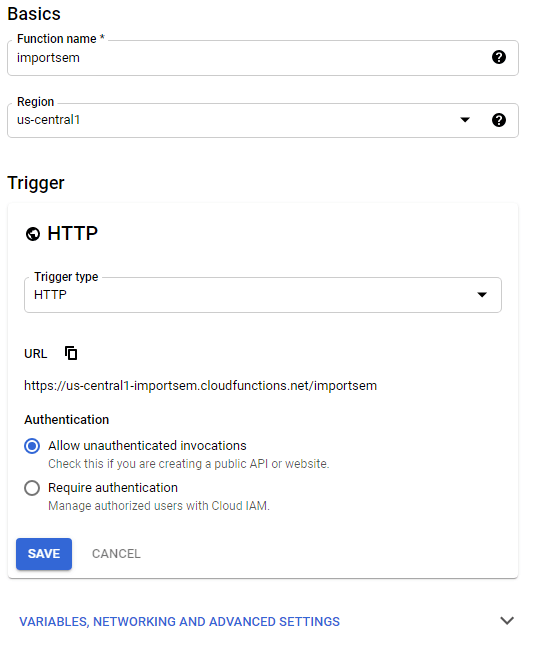
Now with billing out of the way we can start creating our GCF. You’ll be directed to enter a name. This is simply for labeling and is used to create the URL for the function. Next, select a region for where the function should run. This can be your own time zone. Next, you choose a trigger type. Most of the time it will be HTTP unless you’re deep into other development and if that is the case you’ll likely not need this guide. Copy the URL, you’ll need that for the scheduler.
For authentication I mostly use unauthenticated unless you have a script using sensitive operations or paid APIs otherwise I doubt your GCF URL will be found and abused if not too sensitive. Cloud IAM is not difficult but beyond this tutorial. You can set up IAM within GCP, the dashboard is found in the same sidebar as you found GCF, just higher up near the top. For most basic scripts you’ll not need the advanced settings. It has things like environment variables. If you need those, enter them in there. Hit the save and we move on.
Disclaimer: if anyone is thinking of spamming the HTTP link below, know I have removed this function. It does not exist.
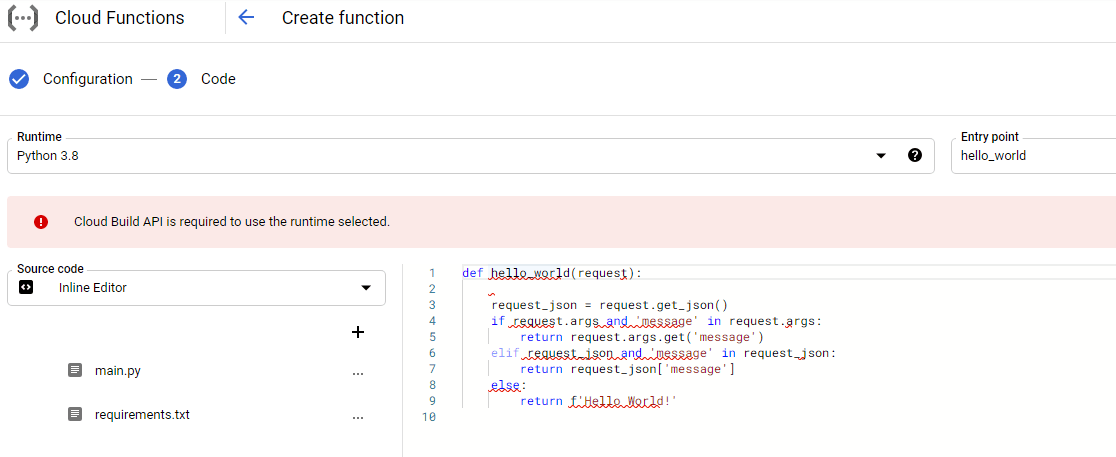
Next, you’ll see a screen like below. First, select the runtime for your script. GCF handles a number of Node and Python versions. Since this is a Python blog, I’d recommend using Python 3.8 unless you have something old you don’t want to migrate and know it breaks in 3.8. Python 3.9 is a new option as a runtime, but safer to choose 3.8 at this time of writing. Next, customize the Entry point. Every script needs a function wrapper that GCF calls to start the script. So your current script needs to be nested under this function wrapper. This will require adjusting your indents and can be a minor pain for large scripts.
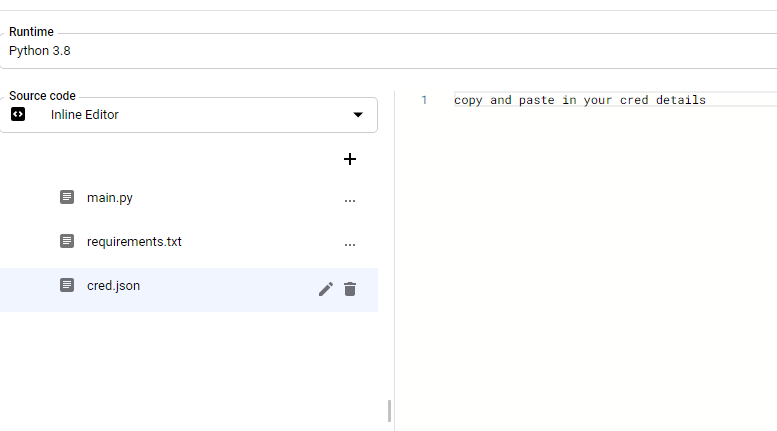
If you’re using GCF for the first time you’ll also be prompted to enable the Cloud Build API. There is a button that chopped off the screenshot below, but you just click it and it guides you through a couple of steps. Nothing to it. Once that is done simply copy your script in the right editor box. Note I’ve found the editor to be a bit clunky. It’s not designed well for inline development. Note the source code drop-down gives you several options for inserting your code (package), but for the most part, it’s easiest to just copy and paste in.
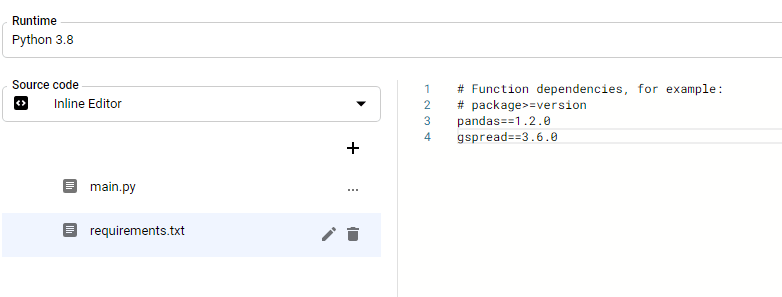
Next, it’s time to handle the requirements.txt. This is where you declare the modules GCF will need to install. These are non-core Python modules. You don’t need to install say requests, datetime or JSON, etc. Be sure to find the exact version you need. Furthermore, even core Python modules get updated and GCF won’t always have the latest. So if you need a version of a core Python module that was just updated then include that in here too.
I’ll also add if you have more files to add like a credential file you can hit the plus sign and it will generate a new file you can name and enter in data.
That’s all there is to it. You’ve just imported and packaged your script to GCF. All that is left to do is hit that deploy button.

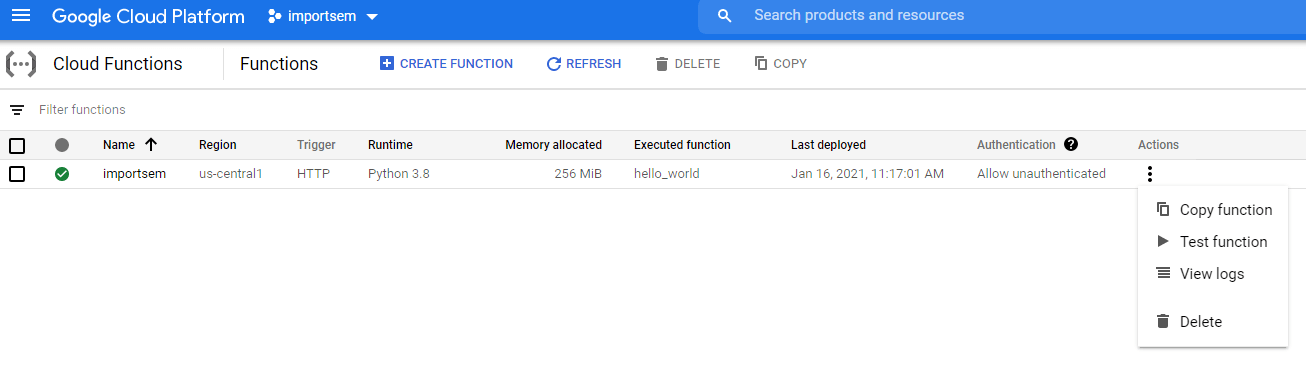
The next screen you’ll see is the function list dashboard showing the one you just created. Just because it deployed doesn’t mean the script will run without errors. For this we need to test the function. Hit the 3 dots icon under actions and select “Test Function”.
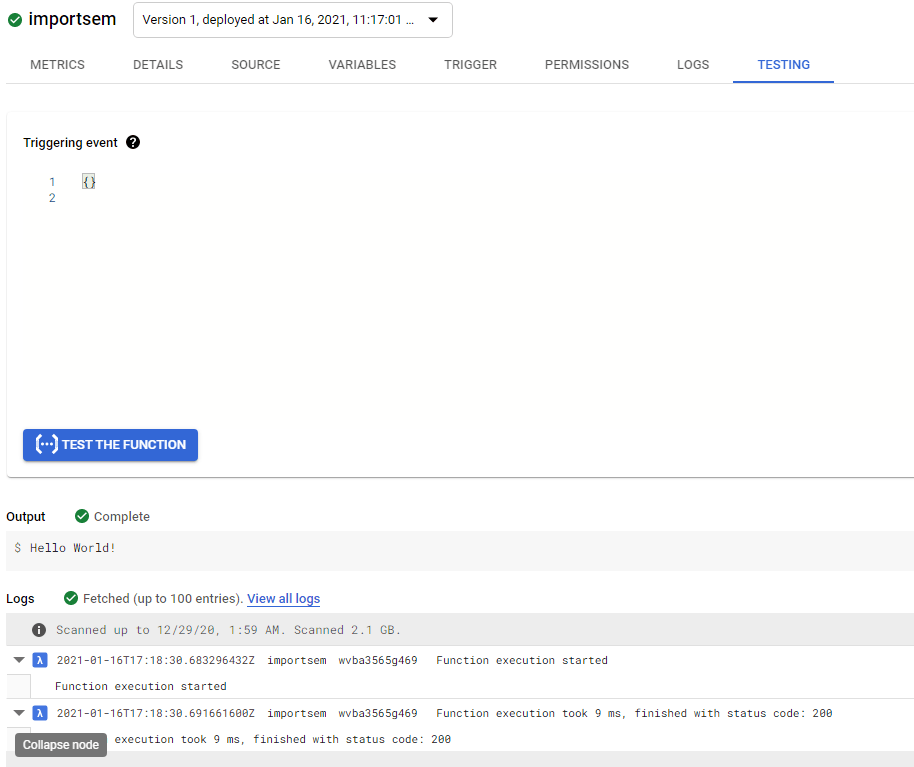
You’ll be shown this screen with plenty to explore depending on your needs, but for basic scripts, you just need to simply hit “Test the Function”. You’ll see some processing activity under output. For testing, it is best to have the function’s wrapper function return some kind of textual output to indicate success. Seeing “hello world” as the output tells us it worked. If it doesn’t you’ll see errors in the logs. Often when you have an error, a status code 500 will be returned. Clicking on a log error will take you to the GCP error logging console where you can find the error stack trace information with the line number of the error. Often when first importing a script to GCF it will be an indent issue or not declaring a module in the requirements.txt.
Setup Google Scheduler
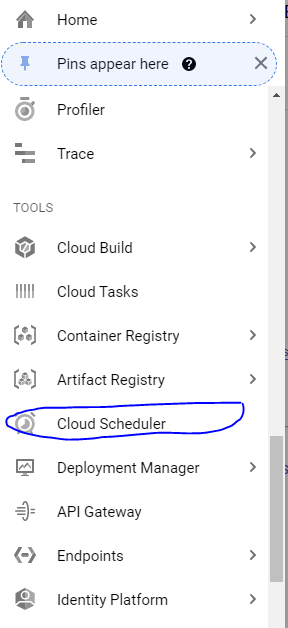
If the above tested showed the output expected and no errors logged you’re ready to schedule this script to run automatically whenever you want. This will require us to use another GCP product called Cloud Scheduler, found in the left sidebar menu when in the main GCP dashboard view.
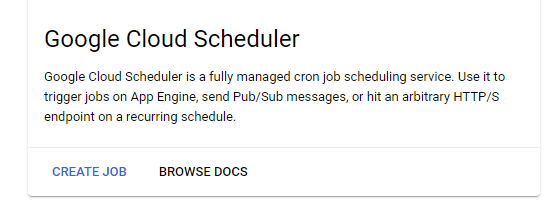
You’ll be first presented with this creation note giving you a little more context to the tool. Simply hit “Create Job” to continue.
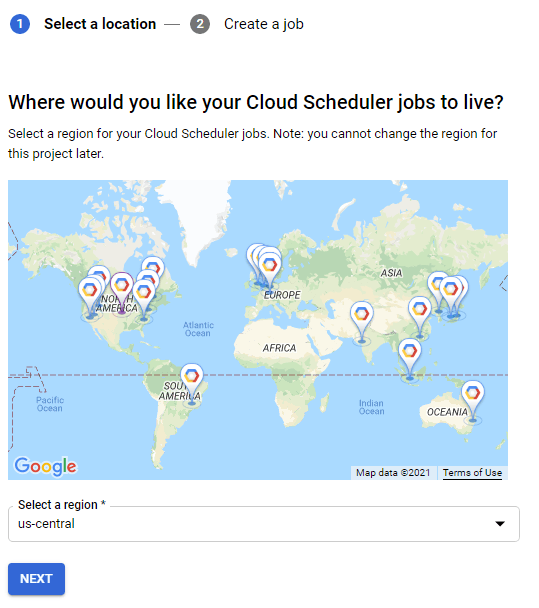
Next, you’ll be presented to select a region where the job to live. This is important because the region determines the time zone of whatever time you set. Obviously, 10 pm in Auckland is not 10 pm in Chicago.
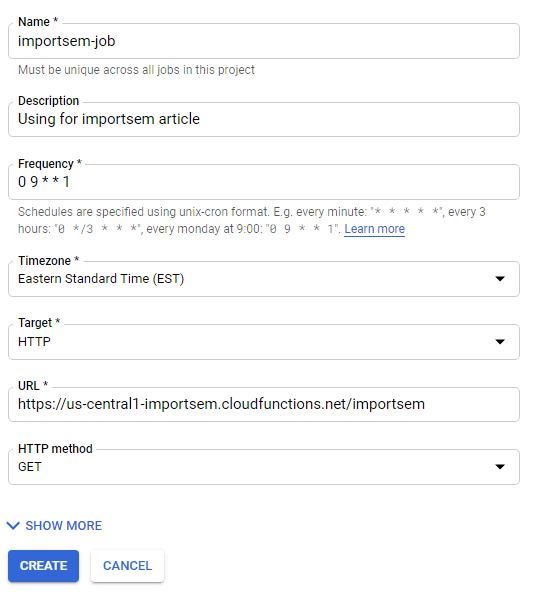
The next screen is fairly straightforward. Add in a name and description. Frequency is when you want your script to run. If you are not familiar with the unix-cron format, you can use a generator here. Then set the time zone for where the script should run. The target for our example should be HTTP as our GCF is an HTTP target. For the more experienced, there are a few other options. Paste in the GCF HTTP target URL I asked you to copy from before. If you didn’t, no problem, open another tab and navigate back to your GCF, edit the function and you’ll see the target URL. The method I’ve used is GET, but perhaps if you’re using an API that is POST, you need to use POST here too. Those more experienced please let me know. Click create and that is it!
You’ll be redirected to the Google Scheduler dashboard which looks similar to the GCF dashboard. I always click “run now” just to see how it interacts with GCF and make sure it works without error.

If the error logs are clean, then congrats you’ve just stored and automated your script in the cloud! Offloading your scripts from Google Colab and your local machine can feel a bit liberating. If you’re tired of running your scripts from your local machine or Colab this is a great way to do it. I know AWS has similar services to AWS Lambda, but I’m happy with sticking with Google products at the moment. If you want to be running large script applications you’re best looking at Google Cloud Run.
Now get out there and try it out! Follow me on Twitter and let me know your applications and ideas!
Google Cloud FAQ
How do I begin using Google Cloud Functions in conjunction with Google Scheduler?
To start, create a Google Cloud project, enable the Cloud Functions and Cloud Scheduler APIs, and set up the necessary permissions. Then, deploy your Cloud Function and create a job in Cloud Scheduler to trigger it.
What role does Google Scheduler play in conjunction with Google Cloud Functions?
Google Scheduler allows you to schedule and automate the execution of Cloud Functions at specified intervals. It acts as a cron job for triggering your functions based on a defined schedule.
Are there any specific considerations when deploying and managing Cloud Functions with Google Scheduler?
Consider factors such as function parameters, authentication, and error handling when deploying Cloud Functions. Additionally, set up appropriate schedules and job configurations in Google Scheduler to meet your requirements.
Can Google Cloud Functions be written in languages other than Node.js?
Yes, Google Cloud Functions supports multiple programming languages, including Python, Go, and Java, in addition to Node.js. Choose the language that best suits your preferences and requirements.
Where can I find comprehensive documentation and examples for getting started with Google Cloud Functions and Google Scheduler?
Explore the official Google Cloud documentation for Cloud Functions and Cloud Scheduler. Additionally, refer to online tutorials and resources for practical examples and detailed guides on integrating and utilizing these services effectively.

- Evaluate Subreddit Posts in Bulk Using GPT4 Prompting - December 12, 2024
- Calculate Similarity Between Article Elements Using spaCy - November 13, 2024
- Audit URLs for SEO Using ahrefs Backlink API Data - November 11, 2024